
I’m often asked by my students which of the crafts that I teach do I like best?
That’s such a hard question. What I do like in constantly discovering new things to try (or add to the list) and that is especially so with Enamelling. The number of different techniques you can try is mind-blowing and then there are all the different design possibilities. Artists such as Sandra McEwen spend a lifetime marrying up their metalsmithing skills with their enamelling ones and specialising in one or two of these techniques in Sandra’s case Cloisonne and champleve. Like everything else the more you do the better you get – everything takes practice.
For those interested in Enamelling here is a brief guide to how to enamel using a kiln.
I would also like to add here that often artists and enamellers do things in slightly different ways, as with most things, you make it work for you and can only teach from your own experience, so I would never say you can only do things my way and I am always happy to learn – hence my passion for teaching.
What is Enamelling?
In this case we’re talking about vitreous enamel, which is the fusing of glass to metal using extreme temperatures ((750oC and higher).
What is it used for?
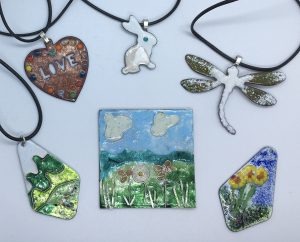
Pieces of jewellery, or decorative items such as pictures and bowls. You’ll also see signs on the underground and even car badges that have been enamelled – these require specialist equipment.
1 Choose your metal
Generally, silver or copper are used although other metals do work. You need to pay particular attention to the metal temperature of your metal to ensure it won’t melt before your glass (enamel) does.
2 Prepare your metal
Fine silver needs little preparation but sterling silver needs to be fired and cleaned several times to reduce the amount of copper on the surface layer. Copper reacts in the kiln causing copper oxide or firescale which is a black layer that needs scrubbing off. Copper needs to be cleaned thoroughly prior to firing – usually with a scouring pad and detergent.
3 Prepare your enamels
You can buy enamels from several suppliers – WG Ball supplies to Cookson Gold in the UK, Vitrium Signum are also very popular with British enamellers as are Corby Kilns but do an internet search and you’ll find suppliers where you are based. Some enamellers never clean their enamels and others always clean them. If you clean your enamels, it produces a clearer glass and is particularly useful when using transparents.
4 Prepare your surface
You’ll need to balance your blank between something (I use two piles of coins) in order to be able to pick it up once you’ve applied enamel powder. You’ll also want to work on a clean sheet for each colour used as this helps to prevent contamination of colours.
5 Counter enamel
Counter enamel, or enamelling the back is done for 3 main reasons. 1 To ensure equal tension on the front and back of the piece – or the glass may break off. 2 To reduce the amount of firescale that builds up. 3 To stop the piece that’s next to your skin tarnishing or causing your skin to go green.
5 Once enamel has been sifted on it can be fired on a stilt or a trivet.
6 Clean firescale off your blank
7 Add more layers to the back if necessary
8 The kiln
Although you can torch fire enamel I prefer to use the kiln for more successful results. Firing times vary depending on colour, size of your blank and what else may be applied, hence it is something you can only really pick up with experience. You’ll be amazed how quickly you just react to what has happened to your piece and troubleshoot timings. However, as a quick guide firings are around 30 seconds to a minute from 750oC.
8 Firing the front
A layer of enamelled colour can then be added to the front of your piece and fired.
9 Add further decoration or master further techniques by continuing to fire several times.
So those are the basics! There’s a lot to take in to start and I really see Enamelling as something that you keep returning to and experimenting with. One of the reasons that there aren’t lots of people teaching Enamelling (or not that I have come across) is that there are so many variables that can affect a piece. It is our job as Enamelling teachers to explain why things have happened and to try to enable students to resolve those issues, or reduce risks of things happening to help them achieve as close to their design aims as possible, for that reason people can get frustrated by it and for others (I consider myself highly in this camp) that is what makes it so interesting.
Making mistakes + troubleshooting = learning
Molten glass + Metal + kiln + experiments = Exciting results
If I’ve interested you and you are thinking about taking a class, here are a few that I have coming up:
Click here for classes in my workshop in Colchester (one to one or one to two) I can also organise dates to suit. These represent great value as you have lots of tutor interaction and I can easily tailor lesson to what you want to learn.
Watershed Studio – 19th July Enamelling for Beginners and Improvers (St Osyth, Tendring)
EJart – Sat 21st May Enamelling on Silver Clay (Woodbridge, Suffolk)
FSC Flatford Mill 3 day jewellery making course – 15th – 17th July inclusive, this a jewellery making weekend including silver clay and Enamelling (residential and non-residential students welcome). (Suffolk)
Any questions do ask. Best wishes, Toni

